
Hearing a prospect say “Yes!” to your proposal is one of the best feelings in business. Whether it happens on a live video call or via an enthusiastic reply in your inbox, verbal confirmation means your strategy, scope, and pricing hit the mark.
However, a verbal “yes” is not a signed deal.
Until money changes hands and a legally binding agreement is executed, your project is vulnerable to scope creep, internal buyer cold feet, and administrative delays. Knowing exactly what to send a client after proposal acceptance is crucial for maintaining momentum and securing your revenue.
In this guide, you will learn the exact sequence of documents, legal agreements, and onboarding assets to send the moment a client gives you the green light.
Key Takeaways
- Speed Is Essential: Send your contract and initial deposit request within hours of getting verbal confirmation to capitalize on high enthusiasm.
- Never Start Without a Contract: Always secure an executed Master Services Agreement (MSA) or Statement of Work (SOW) before opening design tools, scheduling kickoff calls, or beginning work.
- Unify Signing & Payment: Combining legal signature capture with retainer deposit processing in one seamless step prevents onboarding lag and protects your cash flow.
The 4 Essential Items to Send Immediately After a “Yes”
When a client accepts your proposal, avoid sending piecemeal emails over several days. Instead, deliver a clear, structured package containing these four critical elements:
Traditional Fragmented Intake (Days of Waiting):
[Email Thanks] ➔ [Wait for PDF Contract] ➔ [Send Separate Invoice] ➔ [Send Intake Form]

Modern Unified Intake (< 5 Minutes):
[Formal Agreement + Initial Retainer Deposit] ➔ [Client Signs & Pays] ➔ [Instant Welcome Kit & Intake Link]
1. A Formally Executed Contract (MSA / SOW)
Your proposal outlines the vision, but your contract defines the legal boundaries. Never rely on the proposal document alone to protect your business.
Send an official agreement containing:
- Precise deliverables and revision caps
- Payment schedules, late fees, and retainer deposit requirements
- Intellectual property retention terms (reserving ownership until final payment clears)
- Cancellation terms and notice periods
To speed up document creation, many agencies and advisors use an AI contract generator to turn proposal notes into legally binding agreements in minutes. If you work independently, review our step-by-step guide on How to Create a Freelance Contract That Protects Your Business for key protective clauses.

2. An Invoice for the Initial Retainer Deposit
Never start work on goodwill alone. Require a 50% deposit or an upfront monthly retainer before placing a project on your calendar.
Instead of emailing a standalone invoice days later, use modern software like Signly to bind signature capture directly to payment collection. This allows your client to sign the agreement and pay the deposit in one continuous session.
If you are struggling with turnaround delays at this stage, check out our 7 actionable tips on How to Get Clients to Sign Contracts Faster.
3. The Client Welcome Kit & Kickoff Expectation Guide
Immediately after the contract is signed and the deposit is paid, send a brief Welcome Guide (or redirect them to an onboarding page). This document sets professional boundaries from day one.
Your Welcome Kit should include:
- Standard office hours and expected response times (e.g., 24–48 hours)
- Primary communication channels (e.g., Slack, Asana, or email)
- A high-level timeline showing what happens next
4. The Client Intake Questionnaire
To deliver great work, you need access to brand assets, account credentials, target audience insights, and project guidelines.
Send an intake form immediately while client engagement is highest. Keeping your intake form short and structured prevents project kickoff bottlenecks.
The Step-by-Step Execution Sequence
To ensure a flawless transition from sales to delivery, follow this simple operational timeline:
| Timeframe | Action Step | Goal |
| Within 2 Hours | Send combined Contract + Retainer Payment link via Signly | Lock in the agreement while momentum is highest. |
| Upon Payment | Automated email sends Welcome Kit + Intake Questionnaire | Collect necessary access credentials and brand assets. |
| Within 24 Hours | Send Kickoff Call scheduling link | Set the calendar date for project launch. |
Setting up an automated intake pipeline ensures you never miss a step. For a complete deep dive into setting up this infrastructure, read our guide on How to Automate Your Client Onboarding Process: The Complete Workflow Guide.
How Signly Automates Your Post-Proposal Workflow
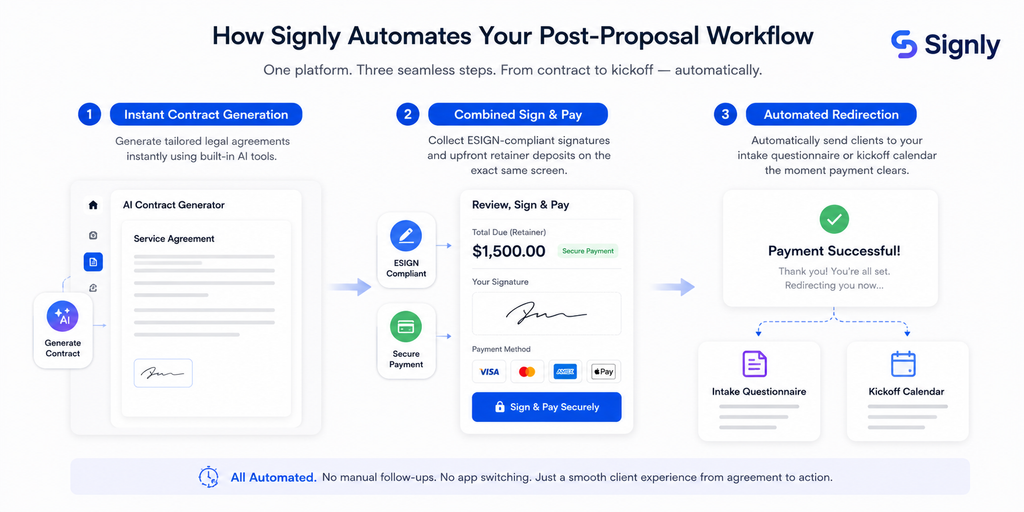
Managing multiple separate apps for contract drafting, PDF signing, invoicing, and client intake creates unnecessary administrative friction.
Signly simplifies your post-proposal sequence into a single, automated engine:
- Instant Contract Generation: Generate tailored legal agreements instantly using built-in AI tools.
- Combined Sign & Pay: Collect ESIGN-compliant signatures and upfront retainer deposits on the exact same screen.
- Automated Redirection: Automatically send clients to your intake questionnaire or kickoff calendar the moment payment clears.
Summary
Knowing what to send a client after proposal approval turns verbal commitments into secured revenue. By delivering a clear agreement, collecting an upfront deposit, and providing an instant welcome guide, you build trust and start every project on solid ground.
Ready to streamline your client onboarding and lock in deals faster? Start building your automated document workflows today with Signly.



3 thoughts on “What to Send a Client After They Say “Yes” to Your Proposal”